

How to Set Up Your Computational Biology Environment in WSL
When I created my windows environment, I wasted a lot of time. This guide will help you save your time by walking through Conda, WSL, and VSCode. By the end you have a basic template from which you can install packages and customizations.
EXPLAINERBEGINNER FRIENDLY
Sohum Bhardwaj
5/23/20253 min read
Intro
If you work on windows like me, you may be saddened to find out that most bioinformatic packages, like the ones I explored in my last blog post, are exclusively available for Linux and, coughs in disgust, Mac. Well, luckily for us Windows users, we have WSL which stands for Windows Subsystem for Linux.
In previous years, people would have to dual-boot or set up a virtual container to use Linux, but WSL literally creates a Linux kernel in your computer that has access to your windows files as well. You can have your cake and eat it too!
Despite being simple to set up, there are some potholes that caused me to waste a lot of time. Here I have outlined a simple guide to set up a WSL environment with Conda and VSCode. After you finish, you should be able to easily install any new packages you may need through Conda, and edit through either VSCode or command line editors.
I have also linked official documentation for every step up the process; however, I found it quite ambiguous which is the reason I am making this guide!
Setting up WSL
You can install several different distributions (versions) of Linux through WSL, but Ubuntu is highly recommended. It is considered a beginner-friendly Linux distribution due to its large community, and almost every single bioinformatics package is compatible with it.
I have linked the official documentation above.
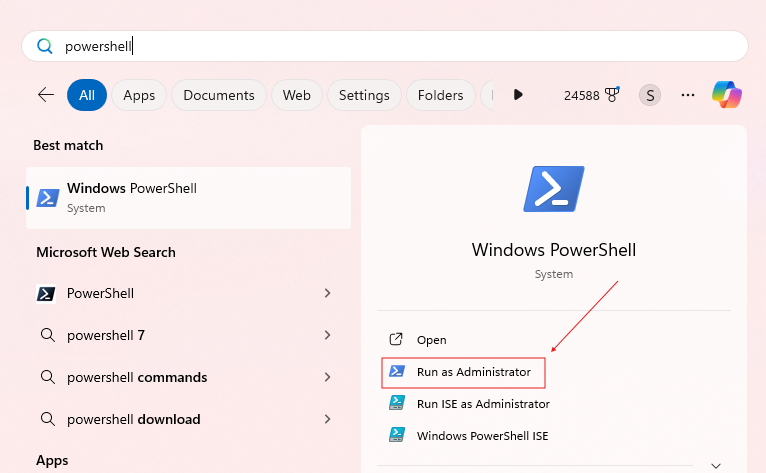
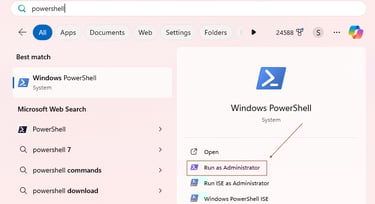
Click your start menu, search up Powershell, and press "Run as administrator"
Then in the command prompt type:
You should restart your computer, then if you want to check that WSL was installed you can run:
Next, we need to install Ubuntu. I prefer using the Microsoft store since it is easier to manage the installation, but you can also install it from the command line. I will show the Microsoft store method here, but the command line method is showcased in the official documentation.
Go to the Microsoft store and search up "Ubuntu" and install the latest stable version, 24.04.1 as of writing this.
After the installation finishes, you should be able to run ubuntu in by searching "ubuntu" in the start menu. Optionally, you can also run :
When you start you will have to make an account, it is pretty straightforward except for typing your password. You may worry when no characters appear, but your characters are still being registered. This is simply a form of password masking.
From there, it is recommended to create a user profile. Ubuntu starts you in the root profile, which is dangerous since it has a lot of power that can be accidently used. Run this command and follow the instructions:
Once Ubuntu and WSL are working, run the following commands to update your system (apt is Linux's package manager):
You can access all your windows files navigating to the "/mnt/c" directory. However, it is recommended you try to keep most of your files within WSL to improve speed.
Conda
Conda is a package manager that allows you to download bioinformatic packages in both R and Python. I prefer to use the lighter weight Miniconda compared to Anaconda. The difference is that Miniconda does not come with any packages preinstalled while Anaconda does.
VSCode
To use VSCode within WSL, you DO NOT install VSCode within your Linux subsystem. You actually install VSCode in windows then by enabling a specific extension that allows you to work with your WSL files.
To install VSCode for windows simply navigate to this page and press "Download for Windows." Run the installer and follow the instructions. It is important that you select Add to PATH when prompted to select additional tasks. It will allow you to use the "code" command in WSL.
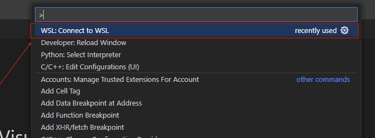
Next, open VSCode. Press "F1" to open the command tray and type "Connect to WSL." When you run the command for the first time, VSCode should install the required extension for WSL.

You should be launched into a new WSL window within VSCode. If you make a new terminal from here, it should be a WSL terminal. Additionally, you will have to reinstall any extensions you wish to use in WSL (there is a separate WSL version of most extensions).
That concludes this guide, you should have all you need to install and work with any packages you wish in your new WSL windows environment. Happy coding!